Sunday, December 29, 2013

30 - WHY COPY?

Christine’s finished shirt.
 
Reasons to copy a ready-made garment:

Christine copies the shirt collar.
1. Want to reproduce the garment.

2. Can learn what the industry is doing and how they do it.  

3. Need patterns from which other patterns can be drafted.

4. If you are planning to work in the industry’s designing departments knowing how to copy a ready-made garment is essential. This is because once a company learns a style is selling, they are quick to copy the style.  It’s not feasible to copy-right most clothing styles because styles change so quickly and so many styles are so similar. The goal is to be the first to have it out on the market, or to be able to produce it at a lower price.

Facts about copying a ready-made garment:

The upcoming 10 week course,
Copying a Man’s Shirt,
starts this Saturday, January 4.
To register call
Laurel at 215 884 7065.
1. No stitches should be taken out of the garment. To do so can twist and distort the garment’s fabric pieces.
2. Not taking out any stitches preserves the original garment, making it accessible for sewing information.
3.  The patterns can be taken off in only a few hours.
4. Because a company’s least expensive garments are usually cut from high-end garments’ patterns, if the pattern is copied from a low-priced garment, the sewing and fabric used to make the copy can be up scaled to produce a high-end garment.
5. Learning the sewing skills needed to sew men’s shirts enables better sewing skills with all clothing.
6. If the fit of the original garment is not exactly perfect, the copied patterns can be corrected to achieve better fit.
7. The upcoming course, Copying a Man’s Shirt, that starts this Saturday addresses this and many other fit issues. This course is about copying ready-made garments.  It specifically addresses copying men’s shirts because that is the garment easiest to copy. So the students start there. 

About copying men’s shirts:

1. Although the easiest garment to copy is a man’s shirt, it’s one of the most difficult to sew.
2. As with any garment, for sewing to be successful, the finished garment must fit. 
3. It’s surprising, when copying a man’s shirt, how bad the fit often is.  I thought this shirt fit my son until I took a better look. There are many other problems with this shirt as well.

Some of the fit issues that are addressed in this course:


Many men’s shirts are too tight at the neck as shown in the neckline in the shirt on the top left.

The picture below it shows the corrected collar and neckline.


As shown on the right the neckline may ALSO need to be raised at center back and lowered at center front to both allow the neckline to fit correctly and the shirt to hang correctly on the body. This is a common problem for both men and women.


One of the biggest problems for many men is finding shirts with sleeves that are wide enough through the biceps (upper arm). Knowing how to make this correction is helpful with women’s sleeves too. Many women also need their sleeve patterns widened through the upper arm. The upcoming course that starts this Saturday addresses this and many other fit issues. 
 
To help with these fit issues the supporting textbook, Copying a Man’s Shirt, includes many charts such as the one below to help with processing the math needed to make these and other fit corrections.


Knowing something about patternmaking is also essential to one’s success 

In the diagram on the left the sleeve cap is being walked around the armhole to make sure it will sew correctly.

Learning high-end sewing skills is another reason to copy a ready-made garment


Understanding how men’s collars are drafted and sewn enables better drafting and sewing of women’s shirt collars. In the course that starts this coming Saturday students learn how to adjust the collar’s fit and style, and then how to correctly sew it to the shirt.


 Many men are willing to pay considerable money for well-fitting shirts.   

Laurel

www.Laurelhoffmann.com- published books
www.ContemporaryFashionEducation.com- school
Facebook:
Contemporary Fashion Education, Inc.
http://contemporaryfashioneducation.blogspot.com/

 P:215 884 7065, C:610 908 7222

Monday, December 23, 2013

29 - MOOSE PAJAMAS


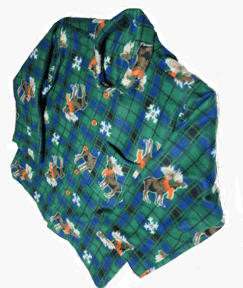
Santa wanted fleece pajamas this Christmas.  Gaffneys Fabrics had only one choice that would do. It was moose on plaid.  So I bought the fabric.


First I needed to correct the PJ pattern I had used in the past. My husband needs patterns to be higher at the center back neck and lower at the center front neck than is the case with commercial (home sewing) patterns. I used his shirt pattern to help with making that correction. His shirt pattern is the one I developed as a sample pattern for the upcoming Copying a Man’s Shirt course that starts Saturday, January 4. The photo on the right shows the corrected pattern after the neckline was raised at center back and lowered at center front. The corrected pattern combines the fit features of Santa’s custom drafted shirt and the looseness of the commercial PJ pattern. The red lines correct the black lines, the blue lines correct the red lines. 

I thought I had enough fabric, but I checked to be sure.  The picture shows how I folded the fabric  to check all patterns that need two plies cut. The large pattern in front on the right is the back pattern. The back pattern has been traced on the fold so as to be able to cut the back on the open. This fabric has to be cut to match. It is impossible to cut any fabric to match if the fabric is laid on the fold. That means that each and every piece has to be cut single ply.

Since the garment had to be matched, next was determining where the hem should be. Cutting the garment so the PJ's shirt and pants’ hems would finish as shown with the black horizontal stripe just slightly above the fold would give a finished look to the PJs.


The center front had to be determined so as to maximize the print’s effectiveness. In the industry markers are used to help with placements when cutting to match. When cutting at home I use my patterns as markers, marking where I want the design to lie in the finished garment. This photo shows where I decided to have the moose lie in the finished PJ's shirt top.


Now it was time to cut. But much of this fleece was off grain. It had been knitted and printed on grain, but fleece is very stretchy and so is almost impossible to keep on grain.  I used my L-squares, 4-foot straight edge (available at hardware stores) and my 18 inch transparent ruler to line up the fabric, forcing it back on grain. I did not press the fabric. All that mattered was that the fabric was on grain where I cut. If so, when the garment is sewn, the finished garment will hang on grain. This is extremely important. Garments cut on grain will last years longer than garments that are not cut on grain.

Cutting the PJ’s was a real task. The plaid helped, but the fabric seemed determined to give me grief. It might have cut easier if I had spread the fabric over tracing paper and cut the fabric and tracing paper together.

  
Sewing the PJs proved to be much easier.
Although knit garments can be sewn entirely on a lockstitch (a basic sewing machine with a bobbin) using an overlock (home sewers call them sergers) makes the job much easier. I first prepped (overcast) the hem, waistband, and facing edges with a three-thread overlock. Then I converted my overlock machine to a mock-safety (four-thread) stitch to sew the seams.

The photo on the right shows the PJ’s side seam being sewn together with a mock-safety stitch. Note the black stitching in the center of the overcasting. It is that center stitching that gives the mock-safety stitch its stability.
The edge that lies at an angle down toward the left is a prepped edge. It has been overcast with three-thread stitching.


You can watch a video of this pant seam being sewn to match at https://www.facebook.com/photo.php?v=773183899377640&set=vb.151215644907805&type=2&theater
As you watch note that the plaid of the top ply of fabric is laid in place over the plaid in the bottom ply of fabric. No pinning or basting is used. Because the overlock has differential feed, both plies are fed into the machine at the same speed. 
Also note that the knife cuts only a few threads away as the fabric is fed into the machine.  As done in industry the seam allowances on all seams that are overlocked have been drafted with the 3/8 inch bite width of the machine, preventing the need for the knife to cut away excess fabric.


Here’s the result on the right. As you can see, the seam matches.

On the left is the finished shirt. The pocket seems low, but Santa wanted it there.  The pants are almost done, but I've got to stop now and make supper.

Happy holidays!

Laurel
 P:215 884 7065, C:610 908 7222
 
One spot is still open in the Copying a Man's Shirt course that starts Saturday, January 4. For more information please visit: http://www.contemporaryfashioneducation.com/schedule.html


Friday, December 13, 2013

28 - FABRIC INTERNSHIP IN INDIA


Jena, fashion designer entrepreneur and Contemporary Fashion Education student, pictured on the right, is about to begin a fabric internship in India. This is the first in a series of occasional posts about her adventures.

Jena designs comfortable, elegant, and sensual clothing for ladies. You can see more of her designs at her Etsy shop. She also makes funky Western-style shirts for men.

She tells me she just ordered a vintage kurta, a traditional dress of India, to wear on her upcoming trip. It is a woven fabric with block printed designs. Unfortunately it was too small. I could barely get it over my shoulders comfortably. So here is what I did to make it fit.

- removed the traditional cap sleeves
- cut new sleeves from a knit fabric that were longer and to my liking
- Removed the back
- cut new back from knit fabric which would give me the stretch I needed to fit comfortably
- From original fabric, I cut bias strips and finished the back neckline, hem and sleeves
- From original fabric, made a patch pocket (barely visible on the bottom left side of the garment front).
- serged the front and back pieces together so the stitches would have some stretch due to merging the woven and the knit

Now I'm ready to go! (well, I still have to pack up my apartment).
Thanks for the class! I'm sure I'll be using more techniques in the future.
Love,
Jena


Below are just a few of her designs. Interested in seeing more?


Laurel

 P:215 884 7065, C:610 908 7222