|
| Shown almost finished is a Christmas present, a dress and bonnet, for a dear friend’s baby girl. |
Above is an almost finished dress and bonnet for a dear friend’s baby girl.
 |
The ensemble was cut and trimmed entirely from
one piece of fabric, shown here. |
One might think two coordinating fabrics and trim were used to make this garment, but that is not the case. The dress, its lining, and its trim were cut from one piece of fabric, shown on the left.
Since most fabrics have no right or wrong side it’s one's choice as to which side is chosen to be the right side. Many fabrics can cut so that one side presents itself as the garment’s principle fabric, and the other side as trim, or as done here, as the lining.
Either side of the fabric could have been considered the right side. If I had wanted to make a very dressy garment the shiny side might have been the better choice to present on the right side of the garment.
 |
The dress and bonnet were made to be worn with the
sweater I had already knitted. Since the sweater had a
matt finish I chose the fabric's matt finish as the side of
the fabric to be the face. |
But I was making an outfit for a baby and wanted a dress that would coordinate with the sweater I had already knitted. So I chose to use the matt side of the fabric for the face (right side).
Since I planned to line the dress I decided that the shiny side would show on the inside of the garment. This meant that I would cut two plies at once. Actually I cut through four plies of the fabric when I cut the side front and back patterns for the dress.
 |
Taping tracing paper to the
front pattern, folding on the
center front line, then tracing
the front pattern onto the
tracing paper ensures that the
finished garment will look
professional. |
The front dress pattern presented the usual problem. The pattern was only half of the front.
So before I cut the dress I taped tracing paper to the front dress pattern, then folded the taped tracing paper on the center front line over the pattern. I then traced the front dress pattern so as to have a complete front. This ensured that the dress front and its lining would be cut correctly.
IMPORTANT: This should ALWAYS be done with patterns that are shown in the pattern packets as being cut on the fold.
No one in the industry EVER cuts a pattern on the fold. There are just too many things that can, and WILL go wrong if one cuts on the fold.
Note that I also reduced the princess seam to 3/8 inch, the neckline to 1/4 inch, the shoulder seam to 1/2 inch, and added 1/8 inch to the back seam so as to set the zipper into a 3/4 inch seam allowance.
There is no point in cutting seams on a 5/8 inch seam allowance and then trimming them back after the seam is sewn. It makes far more sense to mark a new cutting line, being sure to mark the new cutting lines with the use of a ruler for straight seams, and curved drafting tools for curved seams. One then sews the seams, using the gauge on the sewing machine to ensure that the seams are sewn perfectly on gauge.
ALWAYS, before cutting any fabric, mark the direction you plan to cut the garment on the wrong side of the fabric down the selvage, or next to the selvage, with arrows pointing the direction the garment will be cut. This prevents any possibility of shading in the finished garment.
 |
The just published Six-High-End Zipper Sets
presents how industry's top seamstresses set
beautiful, professional zippers in record time. |
 |
The lapped hand-pricked zipper was set first.
|
Once the garment was cut the next step was to
set the zipper, always the first step, or the first possible step
when sewing a garment. This took only a few minutes as I used the high-end method industry’s top seamstresses use to set professional zippers, presented in the 100 plus pages of my just published,
Six High-End Zipper Sets.
 |
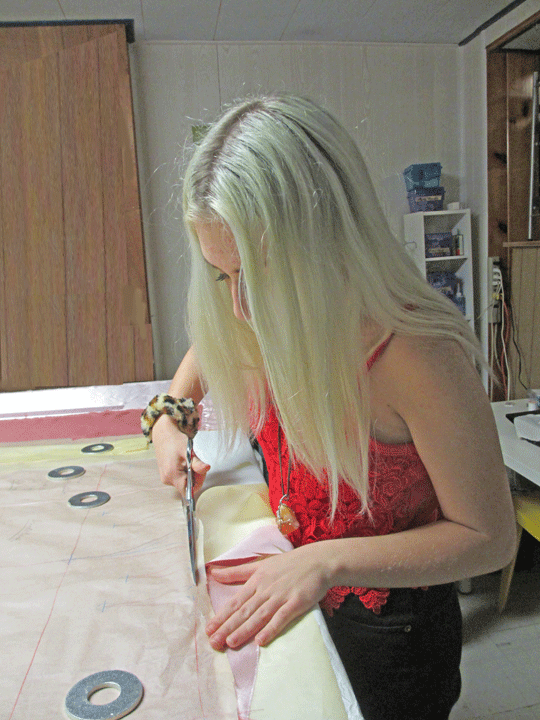
Since the teeth marks were 3/8 inch from the inside
edge of the selvage's fringe, I could cut the selvage the
correct width without first marking a cutting line. |
The trim was made from the fabric’s selvage. I measured 3/8 inch from the inside of the selvage’s fringe. Since there were teeth marks from the weaving, 3/8 inch from the inside of the selvage’s fringe, all I needed to do was to cut along the teeth marks. I then sewed the selvage’s fringe to the front piece’s princess seams before sewing the side front pieces to the front piece.Finally I sewed the side-front princess seams to the front princess seams, sewing in the previous stitching made when I sewed the trim to the front princess seams.
 |
Purchased trimming roses and hand embroidered stems
were added to give some glamour to the dress.
Note the selvage's fringe in the princess seam, on the left. |
The dress seemed a little dull. So I sewed little roses were purchased from Joanne’s Fabrics onto the front of the dress, then embroidered the stems with back stitching.
 |
The shell's hem hangs on the lining, eliminating the need to hand hem.
The garment is encased (clean finished as they say in the industry) preventing the need to overcast the seams. |
The hem was easy. I don't care to hand hem, I don't like hand hemming to show, as it most likely would in this fabric. I prefer not to overcast seam allowances. I like to produce a high-end garment and to get done as quickly as possible, so encasing the dress with the lining was the perfect solution. I cut the lining 3/4 inch shorter than the shell, allowing the shell’s hem to hang on the lining. The shell's hem is sewn to the lining's hem on a 3/8 inch seam allowance, then pressed open so that the shell's hem seam allowance lies down into the hem and the lining's seam allowance lies up.
Notice that the right armhole and both side seams are not yet sewn. All that is still needed is to wrap the right front armhole across the front of the dress and to wrap the right back armhole across the back of the dress, sew the armhole, and pull the entire dress through the tunnel. Next finish the right side seam, then the right side of the hem, finish most of the left side seam, leaving approximately 4 inches of the left seam open, finish the left side of the hem, and finally hand sew the left side seam’s opening closed.
The entire
pull-through process is presented and diagrammed, step-by-step in the last four of the thirty-six chapters in
Design Room Techniques, an encyclopedia of over 400 pages of step-by-step fully-diagrammed high-end sewing information that is available from my
website. The book also contains all the zipper sets in
Six High-End Zipper Sets.
Phone: 215 884 7065
© Laurel Hoffmann, 2016. All rights reserved.
All material on this blog is copyrighted by and is the exclusive right of Laurel Hoffmann.