Sunday, December 29, 2013

30 - WHY COPY?

Christine’s finished shirt.
 
Reasons to copy a ready-made garment:

Christine copies the shirt collar.
1. Want to reproduce the garment.

2. Can learn what the industry is doing and how they do it.  

3. Need patterns from which other patterns can be drafted.

4. If you are planning to work in the industry’s designing departments knowing how to copy a ready-made garment is essential. This is because once a company learns a style is selling, they are quick to copy the style.  It’s not feasible to copy-right most clothing styles because styles change so quickly and so many styles are so similar. The goal is to be the first to have it out on the market, or to be able to produce it at a lower price.

Facts about copying a ready-made garment:

The upcoming 10 week course,
Copying a Man’s Shirt,
starts this Saturday, January 4.
To register call
Laurel at 215 884 7065.
1. No stitches should be taken out of the garment. To do so can twist and distort the garment’s fabric pieces.
2. Not taking out any stitches preserves the original garment, making it accessible for sewing information.
3.  The patterns can be taken off in only a few hours.
4. Because a company’s least expensive garments are usually cut from high-end garments’ patterns, if the pattern is copied from a low-priced garment, the sewing and fabric used to make the copy can be up scaled to produce a high-end garment.
5. Learning the sewing skills needed to sew men’s shirts enables better sewing skills with all clothing.
6. If the fit of the original garment is not exactly perfect, the copied patterns can be corrected to achieve better fit.
7. The upcoming course, Copying a Man’s Shirt, that starts this Saturday addresses this and many other fit issues. This course is about copying ready-made garments.  It specifically addresses copying men’s shirts because that is the garment easiest to copy. So the students start there. 

About copying men’s shirts:

1. Although the easiest garment to copy is a man’s shirt, it’s one of the most difficult to sew.
2. As with any garment, for sewing to be successful, the finished garment must fit. 
3. It’s surprising, when copying a man’s shirt, how bad the fit often is.  I thought this shirt fit my son until I took a better look. There are many other problems with this shirt as well.

Some of the fit issues that are addressed in this course:


Many men’s shirts are too tight at the neck as shown in the neckline in the shirt on the top left.

The picture below it shows the corrected collar and neckline.


As shown on the right the neckline may ALSO need to be raised at center back and lowered at center front to both allow the neckline to fit correctly and the shirt to hang correctly on the body. This is a common problem for both men and women.


One of the biggest problems for many men is finding shirts with sleeves that are wide enough through the biceps (upper arm). Knowing how to make this correction is helpful with women’s sleeves too. Many women also need their sleeve patterns widened through the upper arm. The upcoming course that starts this Saturday addresses this and many other fit issues. 
 
To help with these fit issues the supporting textbook, Copying a Man’s Shirt, includes many charts such as the one below to help with processing the math needed to make these and other fit corrections.


Knowing something about patternmaking is also essential to one’s success 

In the diagram on the left the sleeve cap is being walked around the armhole to make sure it will sew correctly.

Learning high-end sewing skills is another reason to copy a ready-made garment


Understanding how men’s collars are drafted and sewn enables better drafting and sewing of women’s shirt collars. In the course that starts this coming Saturday students learn how to adjust the collar’s fit and style, and then how to correctly sew it to the shirt.


 Many men are willing to pay considerable money for well-fitting shirts.   

Laurel

www.Laurelhoffmann.com- published books
www.ContemporaryFashionEducation.com- school
Facebook:
Contemporary Fashion Education, Inc.
http://contemporaryfashioneducation.blogspot.com/

 P:215 884 7065, C:610 908 7222

Monday, December 23, 2013

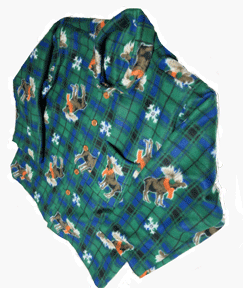
29 - MOOSE PAJAMAS


Santa wanted fleece pajamas this Christmas.  Gaffneys Fabrics had only one choice that would do. It was moose on plaid.  So I bought the fabric.


First I needed to correct the PJ pattern I had used in the past. My husband needs patterns to be higher at the center back neck and lower at the center front neck than is the case with commercial (home sewing) patterns. I used his shirt pattern to help with making that correction. His shirt pattern is the one I developed as a sample pattern for the upcoming Copying a Man’s Shirt course that starts Saturday, January 4. The photo on the right shows the corrected pattern after the neckline was raised at center back and lowered at center front. The corrected pattern combines the fit features of Santa’s custom drafted shirt and the looseness of the commercial PJ pattern. The red lines correct the black lines, the blue lines correct the red lines. 

I thought I had enough fabric, but I checked to be sure.  The picture shows how I folded the fabric  to check all patterns that need two plies cut. The large pattern in front on the right is the back pattern. The back pattern has been traced on the fold so as to be able to cut the back on the open. This fabric has to be cut to match. It is impossible to cut any fabric to match if the fabric is laid on the fold. That means that each and every piece has to be cut single ply.

Since the garment had to be matched, next was determining where the hem should be. Cutting the garment so the PJ's shirt and pants’ hems would finish as shown with the black horizontal stripe just slightly above the fold would give a finished look to the PJs.


The center front had to be determined so as to maximize the print’s effectiveness. In the industry markers are used to help with placements when cutting to match. When cutting at home I use my patterns as markers, marking where I want the design to lie in the finished garment. This photo shows where I decided to have the moose lie in the finished PJ's shirt top.


Now it was time to cut. But much of this fleece was off grain. It had been knitted and printed on grain, but fleece is very stretchy and so is almost impossible to keep on grain.  I used my L-squares, 4-foot straight edge (available at hardware stores) and my 18 inch transparent ruler to line up the fabric, forcing it back on grain. I did not press the fabric. All that mattered was that the fabric was on grain where I cut. If so, when the garment is sewn, the finished garment will hang on grain. This is extremely important. Garments cut on grain will last years longer than garments that are not cut on grain.

Cutting the PJ’s was a real task. The plaid helped, but the fabric seemed determined to give me grief. It might have cut easier if I had spread the fabric over tracing paper and cut the fabric and tracing paper together.

  
Sewing the PJs proved to be much easier.
Although knit garments can be sewn entirely on a lockstitch (a basic sewing machine with a bobbin) using an overlock (home sewers call them sergers) makes the job much easier. I first prepped (overcast) the hem, waistband, and facing edges with a three-thread overlock. Then I converted my overlock machine to a mock-safety (four-thread) stitch to sew the seams.

The photo on the right shows the PJ’s side seam being sewn together with a mock-safety stitch. Note the black stitching in the center of the overcasting. It is that center stitching that gives the mock-safety stitch its stability.
The edge that lies at an angle down toward the left is a prepped edge. It has been overcast with three-thread stitching.


You can watch a video of this pant seam being sewn to match at https://www.facebook.com/photo.php?v=773183899377640&set=vb.151215644907805&type=2&theater
As you watch note that the plaid of the top ply of fabric is laid in place over the plaid in the bottom ply of fabric. No pinning or basting is used. Because the overlock has differential feed, both plies are fed into the machine at the same speed. 
Also note that the knife cuts only a few threads away as the fabric is fed into the machine.  As done in industry the seam allowances on all seams that are overlocked have been drafted with the 3/8 inch bite width of the machine, preventing the need for the knife to cut away excess fabric.


Here’s the result on the right. As you can see, the seam matches.

On the left is the finished shirt. The pocket seems low, but Santa wanted it there.  The pants are almost done, but I've got to stop now and make supper.

Happy holidays!

Laurel
 P:215 884 7065, C:610 908 7222
 
One spot is still open in the Copying a Man's Shirt course that starts Saturday, January 4. For more information please visit: http://www.contemporaryfashioneducation.com/schedule.html


Friday, December 13, 2013

28 - FABRIC INTERNSHIP IN INDIA


Jena, fashion designer entrepreneur and Contemporary Fashion Education student, pictured on the right, is about to begin a fabric internship in India. This is the first in a series of occasional posts about her adventures.

Jena designs comfortable, elegant, and sensual clothing for ladies. You can see more of her designs at her Etsy shop. She also makes funky Western-style shirts for men.

She tells me she just ordered a vintage kurta, a traditional dress of India, to wear on her upcoming trip. It is a woven fabric with block printed designs. Unfortunately it was too small. I could barely get it over my shoulders comfortably. So here is what I did to make it fit.

- removed the traditional cap sleeves
- cut new sleeves from a knit fabric that were longer and to my liking
- Removed the back
- cut new back from knit fabric which would give me the stretch I needed to fit comfortably
- From original fabric, I cut bias strips and finished the back neckline, hem and sleeves
- From original fabric, made a patch pocket (barely visible on the bottom left side of the garment front).
- serged the front and back pieces together so the stitches would have some stretch due to merging the woven and the knit

Now I'm ready to go! (well, I still have to pack up my apartment).
Thanks for the class! I'm sure I'll be using more techniques in the future.
Love,
Jena


Below are just a few of her designs. Interested in seeing more?


Laurel

 P:215 884 7065, C:610 908 7222

Friday, August 30, 2013

27 - SAMPLE MAKING


Sample makers are highly skilled. 

 
A sample garment is an item of clothing used in the fashion industry to represent a clothing style that will be, or is being mass-produced in a range of sizes. The methods used in making sample clothes are the same as those used in mass-production with one exception: one person sews a sample garment together. Many people are involved in the making of a mass-produced garment.

How sample making differs from mass-production:

Mass-produced clothing is made in a factory where each sewing machine operator does one to three or more steps of the assembly process.

Samples are usually made in designing departments.

A sample maker is a seamstress who can make an entire garment using industrial sewing procedures. Sample makers are intelligent and highly skilled. They women work closely with the patterrnmakers and designers, making suggestions and criticisms that are carefully listened to as their suggestions and criticisms will offset problems on the factory floor when the garment is put into production. Traditionally sample makers begin their careers as piece workers in clothing factories where they learn first one operation and then another until finally they know the entire sewing procedure involved in manufacturing clothing.

One sample-maker is responsible for sewing the entire garment together, checking for errors as she does so, and often deciding, as she sews the sample together, the sewing procedures that will work best for that garment when it is mass-produced. Some sample-makers also cut the garments they sew.


Hand sewing is done  in designing departments on high-end garments

Gowns made in 1969 for Atlantic City's Miss America contest.
 
Sample making procedures are also used in the fashion industry to produce high-end garments for retail and special events. Hand sewing is seldom done in mass-production. But this is not the case with high-end garments that often cost thousands of dollars. These garments are usually cut and sewn in the designing departments. The exclusive right to a style garment may be purchased by a high-end store such as Sax Fifth Avenue. A customer will see the sample and decide to order the garment. It will then be made to size in the manufacturer’s designing department.

The very best machine and hand sewing I have ever seen has been in the industry. One might ask what could possibly be so wonderful about a garment that has a price tag of $10,000. But if you were to see such a garment you would fully understand. These clothes are so beautiful and feel so good on the body one might think they were made in heaven.

Sample making is a responsible job. It requires a thorough understanding of how a garment is manufactured.


Laurel

Link for Laurel's books on Amazon
P:215 884 7065, C:610 908 7222

Monday, August 5, 2013

26 – PERSONAL DESIGNING & SHOPPING


Ever wonder how designers organize a line of clothing? Ever wish you could do that for yourself? Come learn how August 28, Thursday evening from 5:30 to 7:30 at the Wadsworth Public Library, 1500 Wadsworth Avenue, Philadelphia where I’ll be presenting a free seminar, Personal Designing & Shopping.


Learn how to efficiently produce an exquisite wardrobe utilizing the same procedures as the industry pros! These techniques from the fashion industry will make organizing your and your family members’ wardrobes much easier. You will find that analyzing individual color and wardrobe styles are not all that difficult to understand. Combined with personal wardrobing, dressing becomes just so much easier.

Included will be tips on how to better organize your closet. You will be given information on how to successfully shop for even the pickiest family member.
Because the most important aspect of anyone’s clothing is color the seminar will include information about color analysis. Done correctly it brings out the very best of a person’s looks. The difference wearing one’s best colors make in one’s appearance is almost unbelievable.
 
In the above picture Fati is being color analyzed. It’s obvious, just by looking at the picture that one of Fati’s best colors is dark green. Not surprising if you have some knowledge of Johannes Itten’s seasonal color theory. You would therefore be aware that her best season is winter and her second best, autumn. I’ve always found Itten’s seasonal color theory the easiest to understand and use. But no matter what color theory one uses, an individual’s best colors are always the same.

In my classes students drape each other and discuss which colors look best. You will learn how to do that at the seminar, August 28. Having a group determine its members’ color palettes works well, enabling the members to become more knowledgeable about color theory.


Once one is aware of one’s best colors and style shopping becomes much easier. It is important to first analyze one’s wardrobe, eliminating the clothing that doesn’t work, determining what is needed to complete clothing that does work. A swatch book in one’s palette is helpful with selecting what works, with organizing, and when shopping.


After eliminating what doesn't work, one should organize what is left. Piling up fabrics that work together spark ideas of what to make that will look good and be enjoyable to wear.


If you sew, organizing a swatch book of fabrics already owned to take with you to the fabric store is a very good idea. The swatch book enables buying fabrics that coordinate with what one already has. It also prevents buying fabric just like that already owned.  Writing the yardages of favorite patterns on the front cover prevents over buying. 


Colors vary in different lighting. Those that match in fluorescent light may not match in incandescent light. Natural light is almost always the best lightening to use when checking color coordination. This is why it is important to check the colors of purchases with each other and with swatches and clothing brought from home.


Organizing solves the problem of what to wear, creating a wardrobe that not only works, but provides clothing ready for use whatever the occasion. When one looks in a closet of a color-coordinated wardrobe, one sees the owner’s color palette. That’s when you know you have done it right.
 
For more information about the seminar
Contact: Juanita Vega-DeJoseph at 215-685-9293 - Wadsworth Free Library
or Laurel Hoffmann at 215 884 7065

Here are some links to color and wardrobing information and materials on the net that my students and I have found helpful:

For information about personal color and wardrobing I’ve always found Carole Jackson’s books, Color Me Beautiful and Color for Men to be outstanding. Each presents a practical application of seasonal color palette system, combined with a realistic approach to individualistic wardrobing .  

In her book Always in Style with Color Me Beautiful Doris Pooser proposes Color Flow, which she discovered and developed into 12 seasonal color palettes. Her book includes her color charts which explain exactly how this color theory works. Her discovery takes the seasonal color theory one step further, making it much easier to understand and use.

Determining one’s best colors is not always easy. Of all the disciplines involved with designing and making clothing the most difficult is color. Help with this can be found on the net at Stylemakeovers. http://www.stylemakeovers.com/swatchbooks.html They offer free, on-line color makeover. They will color analyze from a photo for a very reasonable fee. They also sell excellent color swatch books.

Style and the Man by Alan Flusser, noted NYC expert on men's high-end tailoring. Excellent information on impeccable dressing, plus global sourcing of men's clothing stores.

The Triumph of Individual Style by Carla Mason Mathis and Helen Villa Connor. Through some of the world's greatest artists this book shows the beauty of all figure types and aspects, and how to conceal or highlight them.

Women of Color by Darlene Mathis. Excellent book on determining personal color palettes for women of color.

 
Laurel

Link for Laurel's books on Amazon
P:215 884 7065, C:610 908 7222


Tuesday, July 23, 2013

POST 25 – MUSLINS


The fashion industry and top custom designers make muslins (test garments), often substituting the woven or knit fabric that will be cut in mass-production instead of dressmakers’ muslin. Dressmaker’s muslin is an inexpensive, heavily sized cotton fabric traditionally used during the drafting process to test a pattern’s fit and style.


Cathy tested her blouse pattern in inexpensive fashion fabric, substituting the fashion fabric for muslin.  This is a good idea when testing a blouse pattern. When sewing at home it is usually better to test jacket patterns in muslin because of the extensive construction involved and because fabrics used to make jackets are often quite expensive. Muslin comes in various weights. It’s best to use muslin with a weight as close to the weight of the intended fashion fabric as possible.

In this video link Janet models her jacket muslin. The bodice shell patterns have been cut and corrected several times and now fit correctly.  The next step is to test the sleeve patterns. They need corrections drafted in so they will sew into the armholes.

 
In the industry muslin tests are essential as they prevent problems that, when multiplied by the sheer volume of garments mass-produced from one pattern, could easily add up to thousands and thousands of dollars of lost profit.  Because so much is at stake each pattern that is to go on a factory line needs to be thoroughly tested. Even patterns from styles that have been previously mass-produced should be tested again before they are manufactured in a new fabric.

Muslin tests help you prevent the same problems in the garments you design and make.  Testing a pattern in muslin allows you to check your pattern’s style and fit, decide if corrections are needed, and determine the best way to make the corrections.

Shira’s first muslin on the right shows why testing Shira’s Bat Mitzvah dress several times in muslin enabled success with the finished garment, shown on the left. All problems should be corrected BEFORE the fashion fabric is cut. The rule is, The pattern must fit before the fashion fabric is cut.
 
A designing department is a lab where the patterns' style and fit are corrected. The work done in the designing department makes mass-production possible.  
 

A muslin is quick and easy to make and fit because a muslin is cut from just the shell patterns (all supporting patterns are drafted from the shell patterns). The muslin is sewn with the longest stitch on the machine.  Hand or machine finishing is eliminated or replaced with pinning. A muslin can be written on, ripped, pieced, and pinned. Shira shows how she marked the darts on the muslin for her Bat Mitzvah dress.


In the above picture a front bodice, layered between tracing paper, is being cut from muslin. Care must be taken when cutting muslin, or any fabric, as this, with careful pattern drafting, and precise gauge sewing ensures that the fit is maintained throughout the construction of the garment.
 
Here are some of the reasons muslin tests are worth your effort:


1.       The only way to know if ta garment fits is to try it on. A muslin allows you to do this before you cut the fashion fabric.

2.       Testing in muslin helps you to finish your projects sooner. Using a muslin to correct your pattern eliminates the possibility of spending hours of misery, ripping and altering the finished garment.

3.       Fit and style corrections that would be impossible to make in the finished garment can be easily made in the muslin and then quickly transferred to the pattern.

4.       Making a muslin gives you an overall view of the problems involved in the designing of the garment. It allows you time to think through your solutions before beginning work on the garment.

5.       Running up a muslin makes you familiar with the garment’s construction, making the garment easier to sew.

6.       After you have completed your muslin test and pattern corrections you can cut and sew your garment without any fittings whatsoever, confident your finished garment will fit and look the way you designed it.

7.       Taking the time to test and correct your patterns enables you to produce clothing that is more professional because finished clothing looks more professional when it is cut and sewn with as few corrections as possible.


Laurel
 
Link for Laurel's books on Amazon
P:215 884 7065, C:610 908 7222


Sunday, July 14, 2013

24 – HAIR


“Oh, Lawd, not another conversation about black Hair.” began Elizabeth Wellington’s  Mirror, Mirror column in the Inquirer Magazine section on March 01, 2013 


My answer then and now is:  

OK Elizabeth, I ‘m not going to talk about black hair. What I’m going to talk about is women’s and little girls’ hair. I’m white. My family produces little girls with straight hair. May sound good to women of color, but that’s not good to white women. Curls are a MUST! 


At age 6 my straight hair was braided. But by the time I was 9 my hair had to be curled. As is very evident from the picture on the right, curls didn't work well for me. When straight hair came in in the sixties I thought I had died and gone to heaven! People asked me how I got my hair so straight. Did I iron it? I said No, it just grows that way. Oh, they replied, obviously impressed. Finally I had the RIGHT hair. It was a wonderful feeling!
 
As a child I sat under a miserable contraction with wires that came down from overhead and that were attached to big clips that where clamped on my hair that was tightly curled up. I had two fears, electrocution and that if I were to bend my head even slightly the weight of this contraption on my head would cause my head to separate from my body. The glorious result?  Thanks to the need for curls I spent most of my childhood dealing with split ends.  And, just in case anyone is wondering, the perms never really worked. Right after the ordeal my hair frizzed, then over the next several weeks it gradually became straighter and straighter.  The split ends, though, were constant. 

My friends of color were undergoing some crazy procedure that was probably just as nasty. Their mothers were just as determined that they would not have nappy hair.  

So there we were, growing up with the constant reminder through these crazy hair rituals that we weren’t right. Needless to say the boys’ hair was always the way hair should be. They didn’t go through any of this. But we girls were wrong. We knew that because of the extreme effort our mothers made to correct the curl or lack of it in our hair.

NO MORE! I campaign for natural hair. Mother Nature gets it right! So why argue with her? I lead the battle for natural hair. Mine is cut about once a month and the rest of the time I wash and blow dry it and that’s it. I don’t color it either – because if I leave it alone it then matches my natural palette. 

I refuse to take up with all these stupid advertisements that try to convince me that if I just buy some coloring product or spend hours in the beauty chair that this will somehow make me more attractive to the world in general. The REAL attraction is that of Wall Street to my pocketbook.  

My advice to the women of the world?
 
Leave your hair alone!


Laurel
Link for Laurel's books on Amazon
P:215 884 7065, C:610 908 7222