If a bodice pattern has bust darting the darting often needs to be moved to allow the bodice to fit correctly.
Here are instructions that show how to do that.
 |
| 1. Measure from point to point. Divide the measurement in half. |
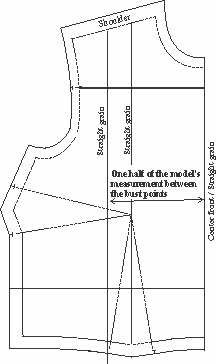 |
2. Mark a straight-grain line
on the front bodice pattern,
that distance from the
center-front grain line.
|
 |
4. Mark the true bust point on the
bodice pattern, the measured
width from the center front to
the true bust point.
|
2. Mark a straight-grain line on the front bodice pattern, that distance from the center-front grain line.
 |
3. Measure the length from
the shoulder to the true bust point.
|
3. Measure the length from the shoulder to the true bust point.
4. Mark the true bust point on the bodice pattern, the measured width from the center front to the true bust point.
 |
6. Lay tracing paper over the dart
area.
|
 |
5. Lay the pattern over the
model to see if the true bust point
is correct.
|
5. Lay the pattern over the model to see if the true bust point is correct.
6. Lay tracing paper over the bodice pattern's dart area.
 |
| 7. Use RED pencil to trace the darts. With RED pencil trace the straight grain that is marked through the waist dart. |
 |
8. Move the traced darts and
straight-grain line so the traced
original true bust point now
lies over the true bust point.
Tape the tracing in place.
|
7. Use RED pencil to trace the darts. With RED pencil trace the straight grain that is marked through the waist dart.
8. Move the traced darts and straight-grain line so traced original true bust point now lies over the model's true bust point. Tape the tracing in place.
 |
9. Trace the front bodice with the new
carts. Add a 3/4 inch seam allowance
down the center front.
|
 |
10. Cut the front and back bodices in
muslin. Pin together. Check the bust
fit. Mark the darts' sewing points.
Re-pin the darts.
|
9. Trace the front bodice with the new darts. Add a 3/4 inch seam allowance down the center front.
10. Cut the front and back bodices in muslin. Pin together. Check the bust fit. Mark the darts' sewing points. Re-pin the darts.
 |
11. Lay the front bodice pattern over
the muslin. Copy the sewn dart pints.
Mark the sewn dart points with BLUE
pencil.
|
 |
12. From the lower third of the
armhole mark a line to the
true bust point.
|
11. Lay the front bodice pattern over the muslin. Copy the sewn dart points. Mark the sewn dart points with BLUE pencil.
12. From the lower third of the armhole mark a line to the true bust point.
 |
13. Fold the bust dart as shown. With RED pencil
connect the underarm/side seam intersection with
the waistline/side seam intersection.
|
13. Fold the bust dart as shown. With RED pencil connect the underarm/side seam intersection with the waistline/side seam intersection.
Thanks for reading! Your comments are most welcome. Questions? Email or call 215 884 7065.
Look for the article about seam allowance modification that I wrote for Threads Magazine. It is in their 199 issue that is now in libraries and on the newsstands.
I am currently working on a book that presents how to custom grade patterns to fit. All work can be done in the home with minimal equipment - tracing paper, pencils, transparent ruler. I'm hoping to have that book finished by the end of this year. It's sequel, Grading and Sewing a Blouse is finished and will be offered as a sweet deal with the grading book.
https://cfashionedu.com/
Twitter: https://twitter.com/LaurelHoffmann1
email: Laurel@CFashionEdu.com
Phone: 215 884 7065
© Laurel Hoffmann, 2018.


